By Christian Davies
•
May 12, 2022
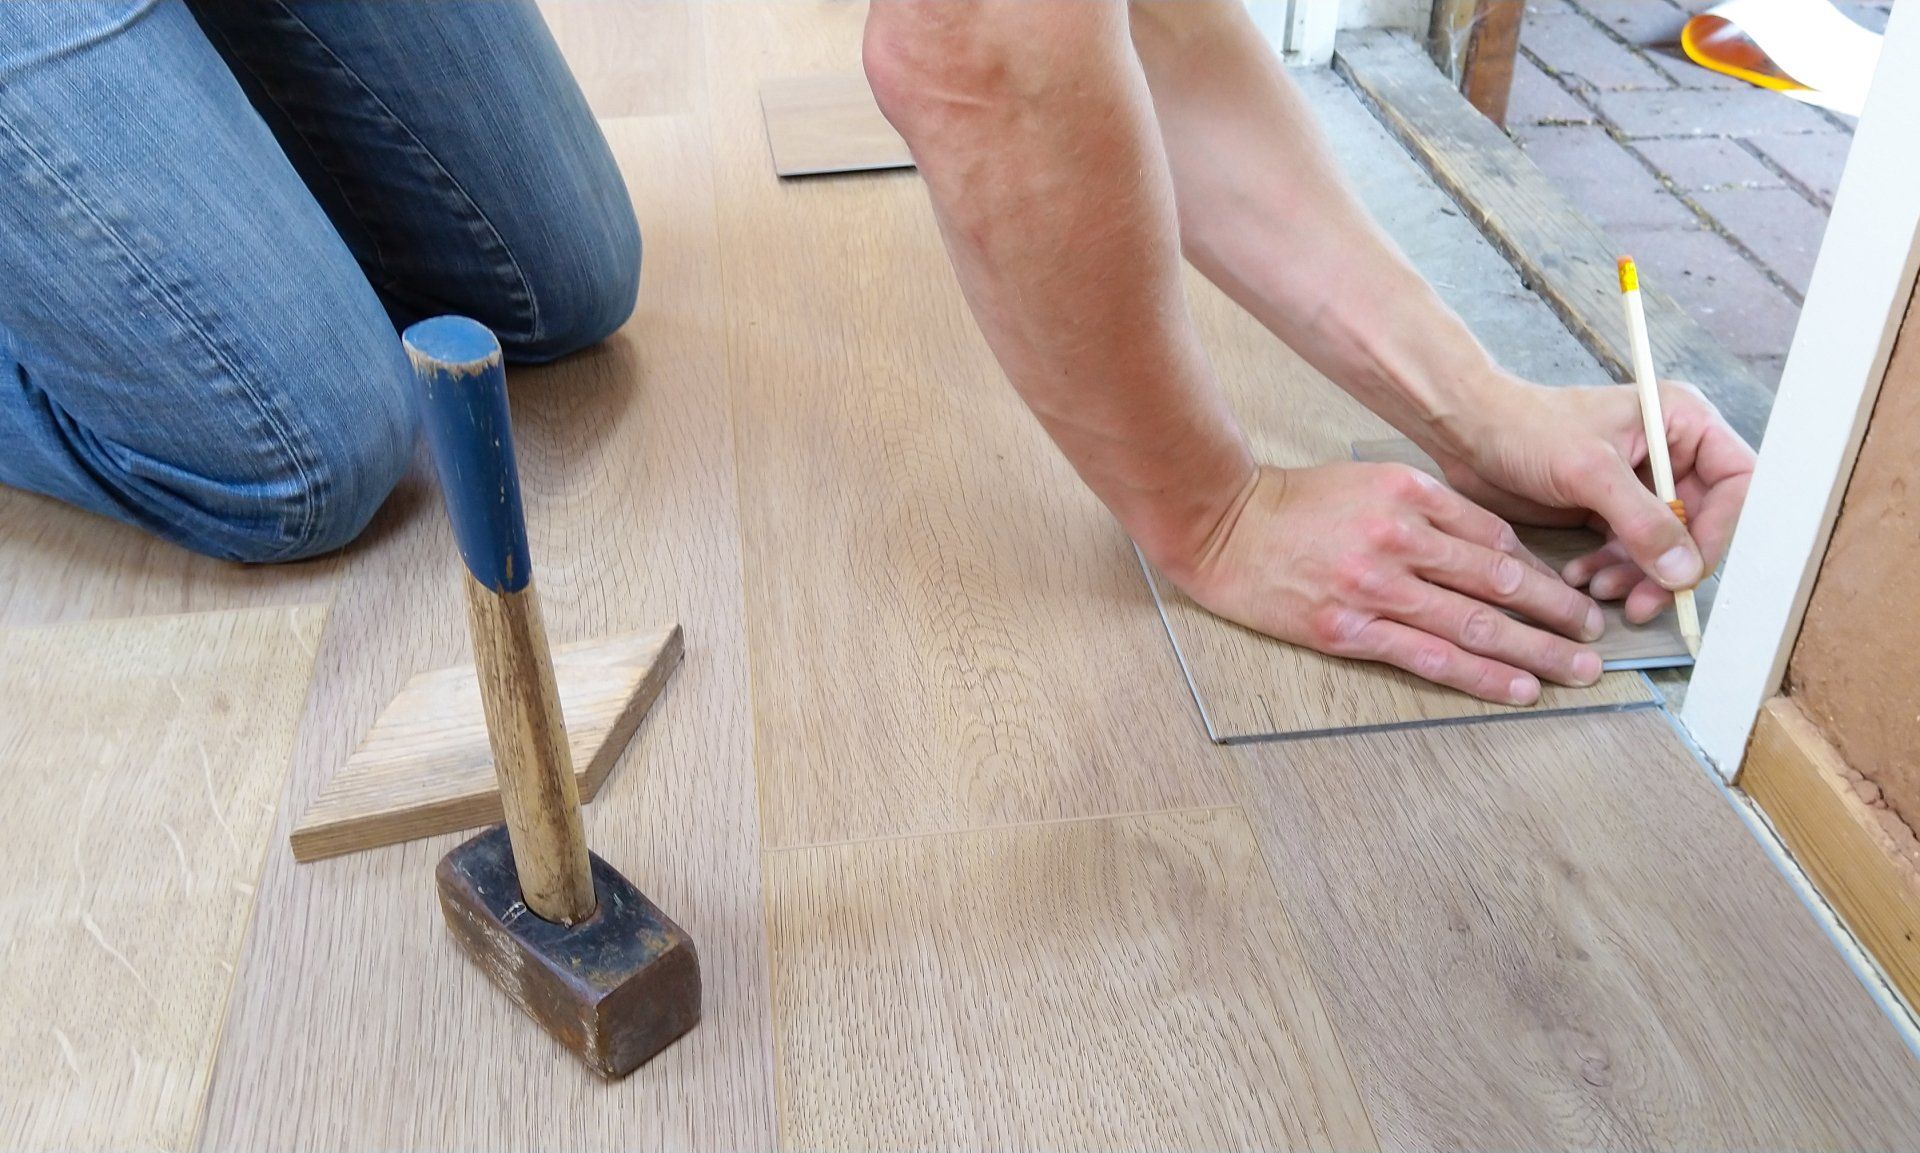
How to Install Laminate Flooring When you are ready to install new flooring , make sure you’re familiar with the steps to lay them correctly the first time. While beginner and intermediate DIY-ers can complete this project successfully, laminate flooring installation requires accurate measurements and proper technique. Follow these steps to install new laminate floors in your home: Step 1: Acclimate Your Planks and Prep the Subfloor Before you can install your new floor, your laminate planks will need to acclimate to the room first. Lay out the pieces of laminate in the room in which you’ll be installing them, and let them sit for at least 48 hours. This allows them to acclimate to the temperature and moisture conditions in the room before installation. Next, you’ll need to prepare the subfloor. You’ll know it’s safe to install flooring when the subfloor is clean and smooth . You can often install laminate over old floor coverings like sheet vinyl as long as it’s flat, smooth, and not too soft. Most of the time, however, you’ll want to remove the existing flooring, as well as scirting boards and trim around the room. Sweep or vacuum away any mess, then check that the base floor is level. For concrete basement flooring, fix any chips in the flooring with a patching compound. For wood subfloors, make sure to remove loose nails and patch cracks, and sand uneven areas. If any planks are damaged, you may want to replace them before covering them. Step 2: Trim Doors When laying flooring around doors, it’s often a bit easier to cut down some trim from the doors than to cut your flooring materials to fit an irregular shape. When you trim some wood off of the bottom of your trim, it allows your flooring to fit underneath for a seamless result. First, place a piece of laminate over your underlayment, then line it up against the door frame. Use a pencil to mark where the top of the laminate meets the frame. This tells you where to cut. Then, use a jamb saw to remove the small piece of wood. When you’re installing, you should be able to smoothly slide your flooring in the small gap. Step 3: Install Underlay Before placing your laminate planks, you must install the underlay. This thin, dense foam is designed to help absorb sound and make your floors warmer. It can also act as a bridge over any gaps or dents in the subfloor layer underneath. Some laminate floors come with underlayment built-in; if so, you can skip this step. If your flooring does not come with its own underlay, start by rolling out two rows of underlay. Trim the pieces with a utility knife to fit the width of the room. Use tape or underlayment adhesive to stick the adjacent pieces together. When you’re laying the sheets of underlay next to each other, make sure they’re not overlapping. You want to keep your underlay from stacking on top of another layer, as this could create bumps on uneven sections in your floors. If you’re installing laminate in high-moisture rooms like basements or kitchens, it’s best to install a vapor barrier before placing your underlay. Step 4: Lay Your First Row of Laminate Now, you must decide which wall you’ll begin the installation. It’s a good rule of thumb to start applying flooring against the longest wall. However, if there is a big focal point in the room like a fireplace or large windows, you may want to start applying your flooring parallel to that wall. Start your first row by placing the planks with the tongue side against the wall. You can also trim the tongues off the boards in the first row with a utility knife. However, because the baseboard will cover a bit of your first and last row, trimming off the tongue is not necessary. Next, place the groove of the following piece into place, then press down to snap it secure. Use ⅜ inch spacers along the wall to leave room for the flooring to expand and contract over time. Then, continue placing planks until you reach the last one in the row. You may have to cut the final piece to fit the space perfectly, making sure to leave an expansion gap. Step 5: Continue Laying Planks To start the second and subsequent rows, place a plank that is either longer than or shorter than the first plank in the first row. (Use the portion that you just cut from the last piece in the first row.) Staggering the seams in each row helps create a more secure installation and attractive look. Try to stagger at least a foot from the adjacent seam. When installing the subsequent rows, you may have to wiggle the planks to fit them into the groove and snap into place. Many manufacturers suggest using a tapping block or a pull bar to secure the planks. These tools help to ensure that they are tightly secured with no gaps in between. To install the last row, you may need to cut a bit of width off of your planks. When installing the last row, it helps to place your planks at an angle to fit them into the tight space. Step 6: Add Finishing Touches When you’re done installing your floors, remove the spacers from against the walls. Install door thresholds and baseboards around your room. Make sure to caulk the edges of the baseboard to achieve a smooth, finished look. DIY Installation vs. Professional Installation There are many pros and cons to both do-it-yourself flooring installation and hiring the professionals. Your decision should be based on your budget and your comfort with standard power tools. Laminate flooring installation has an intermediate level of difficulty. Installing laminate flooring on your own will take a few hours, and it requires the right type of equipment to ensure a solid and secure installation. It’s a dry installation, which means you do not have to use grout or mortar to install flooring. However, if you have not completed a similar joiner project before, or if you do not already have most of the necessary equipment, you may benefit from working with a professional. Effortless Floors offers a full supply & installation service for customers across the North West, with dedicated teams of specially trained and insured laminate fitters. Through our home visit service you can choose the flooring to suit your needs, then once you're happy place and order and set an insallation date - our team will arrive, prepare the floor, install and clean up after themselves. Get in touch to arrange a free, no obligation quotation today!